
Firmable supports single sign-on (SSO) with Okta, Microsoft Entra ID, Google Workspace and other SAML or OpenID Connect (OIDC) identity providers. An Admin sets it up in Firmable from Manage account, then your team signs in with their work credentials.
Prerequisites
- You are on an Enterprise plan with Firmable, with SSO included.
- You have the Admin role on Firmable.
- You can add a DNS TXT record for your email domain.
- You're an administrator in your identity provider, for example an Okta administrator.
If you don't see Security in the Company panel, contact us at support@firmable.ai.
Step 1: Add your domains
- Click your profile picture (top right) and select Manage account.
- Click Users in the Account settings sidebar, then click Security in the Company panel.
- If your email domain is listed under Verified domains on the General tab, remove it there first.
- Under SSO, click Configure.
- Type your domain and click Add, or click the suggested domain.
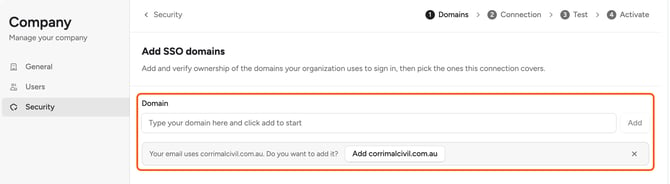
- Add the DNS TXT record shown to your domain to prove you own it. Add every domain your team signs in with.
- Once a domain is verified, select the domains this connection covers and click Continue.
Step 2: Connect your identity provider
- Choose your identity provider: Okta Workforce, Microsoft Entra (formerly AD), Google Workspace, Custom SAML Provider or OIDC Provider.
- Follow the steps shown for your provider. For SAML providers, Firmable shows an Assertion consumer service (ACS) URL and an Entity ID to add in your identity provider. You then give Firmable your identity provider's Metadata URL, or enter its SSO URL, Entity ID and signing certificate by hand.
- For OIDC, register the redirect URI Firmable shows, then enter your discovery endpoint and the app's Client ID and Client Secret.
Set up the app in Okta
- Sign in to your Okta dashboard and select Admin in the top right corner.
- In the side navigation, go to Applications and select Applications.
- Click Create App Integration, choose SAML 2.0, then select Next.
- Complete the General Settings (App name is required) and select Next.
- On the Configure SAML page, enter the values from Firmable:
- Single sign-on URL: the Assertion consumer service (ACS) URL.
- Audience URI (SP Entity ID): the Entity ID.
- Select Next, complete the Feedback page, then click Finish. You'll land on the app's Sign On tab.
- Scroll to Attribute statements and click Add expression. Enter the Name and Expression for each attribute, then click Save:
- Email address (required) > Name: mail, Expression: user.profile.email. This is the email address your users sign in with.
- First name (optional) > Name: firstName, Expression: user.profile.firstName
- Last name (optional) > Name: lastName, Expression: user.profile.lastName
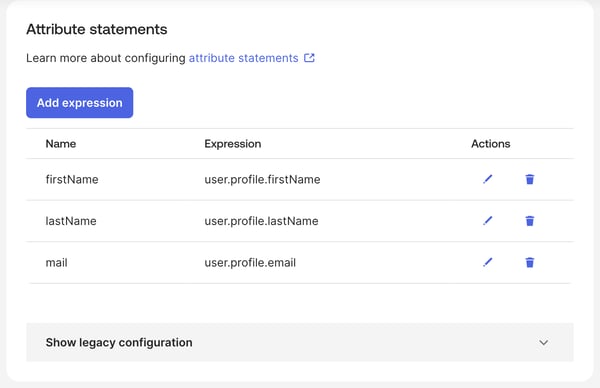
- On the Assignments tab, select Assign, then Assign to People or Assign to Groups. Only assigned users can sign in with Okta.
- On the Sign On tab, under Sign on methods, copy the Metadata URL and paste it into Firmable.
Step 3: Test the connection
- Run the test sign-in. The connection isn't live yet, so testing doesn't affect anyone else's sign-in.
Step 4: Activate SSO
- Once the test passes, activate the connection. It shows as Active on the Security tab.
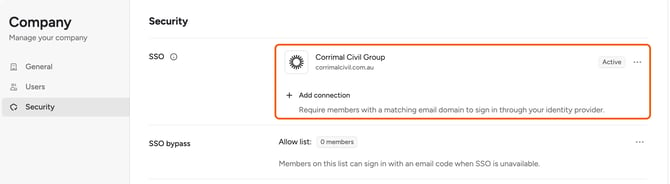
- From then on, anyone with an email on your SSO domains signs in through your identity provider. Members without a matching domain can still sign in with their existing method.
- New members who sign in through SSO join as Standard users, which take a paid seat. Learn more about user roles and permissions.
Manage your SSO connection
- Click the ... next to your connection to Edit, Deactivate or Remove it. Changes to an active connection apply straight away.
- In Edit, you can turn on Allow IdP-initiated flow so your team can sign in from the Firmable tile in your identity provider.
- Under SSO bypass, click ... > Manage to add members who can sign in with an email code when SSO is unavailable.
- To set up Directory Sync (SCIM) so users are added and removed from your identity provider, contact us at support@firmable.ai.