
Firmable now supports SAML-based single sign-on (SSO) via Okta.
This guide will walk you through configuring Firmable as an enterprise app inside Okta so your team can log in securely with their Okta credentials.
Prerequisites
Before you begin, please make sure:
- You are an Okta administrator.
- Your Firmable account includes SSO as part of your Enterprise subscription.
Step 1: Create a new enterprise app in Okta
- Sign in to your Okta dashboard.
- Select Admin in the top right corner.
- In the side navigation, go to Applications and select Applications.
- Click Create App Integration.
- In the Create a new app integration modal, choose SAML 2.0, then select Next.
- On the Create SAML Integration page, complete the General Settings (App name is required).
- Select Next. You'll be redirected to the Configure SAML page.
- Enter the following values, as supplied to you by the Firmable team:
- Single sign-on URL
- Audience URI (SP Entity ID)
- Select Next, complete the Feedback page, then click Finish. You'll land on the app's Sign On tab.
Step 2: Add the attribute statements
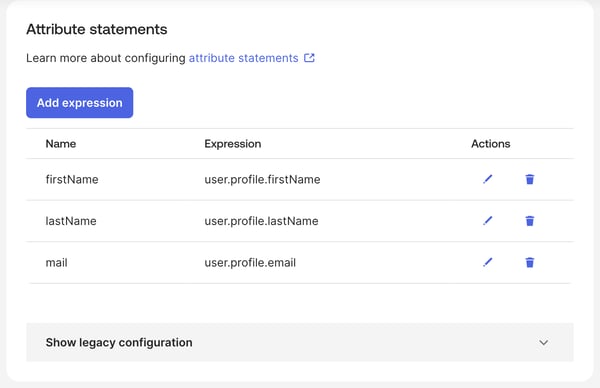
Firmable expects your SAML responses to include these attributes:
- Email address (required) > Name: mail, Expression: user.profile.email (Note: This is the email address that your users will use to authenticate into your app)
- First name (optional) > Name: firstName, Expression: user.profile.firstName
- Last name (optional) > Name: lastName, Expression: user.profile.lastName
To add them in Okta:
- On the app's Sign On tab, scroll to Attribute statements.
- Click Add expression.
- Enter the Name and Expression for one attribute, then click Save. Repeat for each attribute.
- Your screen should look similar to the example below:
Step 3: Assign users or groups
Users or groups must be assigned before they can log in with Okta.
- In the Firmable app in Okta, select the Assignments tab.
- Select Assign, then Assign to People or Assign to Groups.
- Assign users or groups as needed, then click Done.
Step 4: Share the app's metadata URL
Go back to the app's Sign On tab.
- Under Sign on methods, copy the Metadata URL.
- Share this URL with the Firmable team so we can complete the connection on our side.
Next steps
Once we receive the metadata URL, our team will finalise the SSO connection. We’ll confirm once everything is active, and your assigned users will then be able to log in to Firmable using Okta. If you run into any issues, please contact support@firmable.ai.