Below is a step-by-step guide detailing the process of installing the Salesforce Integration including setup prerequisites, setup steps, and property mapping processes.
Learn more:
Mapping company (account) fields
Create custom Firmable ID field in Salesforce
Prerequisites
Before initiating the integration, ensure the following:- You are on a Small Teams or Teams Pro plan with Firmable.
- You have the Admin or Integration role permission on Firmable and the System Administrator role in Salesforce.
- Your Salesforce instance will need to have APIs turned on. See this guide for more information.
- Please log into Salesforce in a separate tab before you integrate Firmable.
Note: If your company has multiple Admins, the app only needs to be installed once by one Admin. All other Admins and users can subsequently use it.
Integration setup within Firmable
Connect the integration
- Log into Salesforce in a seperate tab.
- Log into your Firmable account to begin your installation process.
- Click on Manage account in the top right corner.

- In the secondary menu, click on Integrations.

- Locate the Salesforce integration. Click on the Salesforce icon to connect

- Please ensure you have logged into Salesforce in a separate tab. If you need to connect to a custom domain, click “Use Custom Domain” option on the Salesforce login screen.
- Select if you are connecting to sandbox or production Salesforce account.
.png?width=670&height=274&name=image%20(36).png)
- If you are entering your subdomain on connect, enter your Salesforce Subdomain when promoted
- In Salesforce, your subdomain is the first part of your Salesforce environment’s URL.

- In Salesforce, your subdomain is the first part of your Salesforce environment’s URL.
- If you are entering your subdomain on connect, enter your Salesforce Subdomain when promoted
- Click Allow to give permission for the integration.
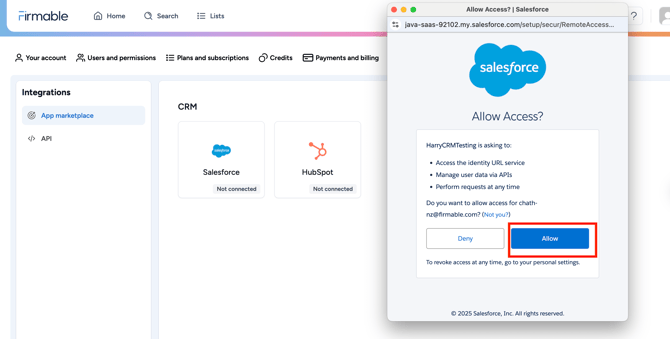
- Now your Salesforce Integration will be connected to your Firmable account.

How to map users (optional but recommended)
Note: If users are not mapped, the default behaviour is to set record owner to the integration user.
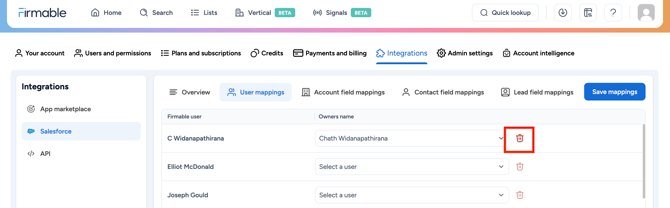
- Click User mappings.

- Select the corresponding Firmable user from the dropdown to update the Owner name field.

- Repeat for each Firmable user and click Save mappings.

- To clear user mapping, click the rubbish bin icon and click Save mappings.
Mapping company (account) fields
Note: Firmable matches company records by website domain, so ensure the domain or website field is mapped correctly at your endpoint to enable accurate record matching downstream to avoid duplicate records.
- Next step is to review a list of Salesforce organization fields mapped to corresponding Firmable company fields. Under Integrations, click on Salesforce.
- By default the Organization record type will be set to Master, select which company record type you're mapping these Firmable fields to in Salesforce.

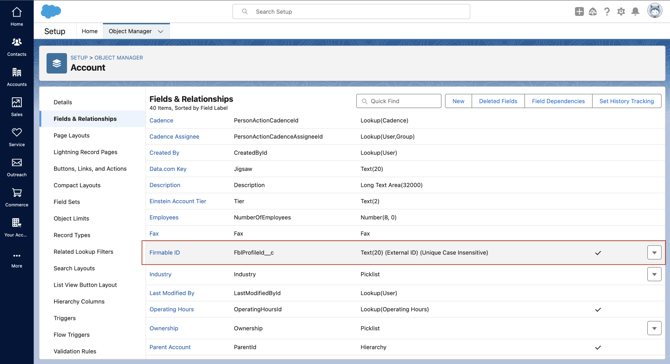
- It's mandatory for the Firmable ID to be mapped. You can choose an existing Account property to map. This property will need to have the the data type: "text/string".
- Alternatively, if you created a custom property in Salesforce account object (in the instructions below) map the Firmable ID to that field.

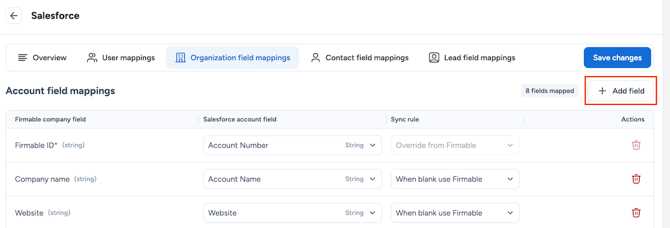
- Change the other pre-selected (or empty) Salesforce fields under the Salesforce account field dropdown to map to available Firmable data fields. Note, Firmable will map some Salesforce fields by default.
- If a Salesforce field is already mapped, it will be greyed out and unavailable for selection. To map it to another field, you’ll need to clear the current mapping first.

- To add more fields to map, click Add field
- Use the search bar to find the field you want to map, or browse the category list and expand a category using the down arrow.

- Click + Add to include the field in your mapping.

- Use the search bar to find the field you want to map, or browse the category list and expand a category using the down arrow.
- Tips on some specific field mappings:
- Source: Used to identify the record origin, it will be populated as Firmable in Salesforce when mapped. This is optional and you can use an existing source field or create a new custom one (so long as it is a text field, suggest max 10 characters).
- Created by: Identifies the Firmable user (full name) who pushed the record. This is optional and you can use an existing source field or create a new custom one (so long as it is a text field, suggest max 50 characters).
- First name and Last name: Avoid using the Salesforce Name field for mapping here as it is the full name in one field. Best to map the individual First name and Last name fields instead.
- Once you’ve reviewed all the properties you want to connect, select the Sync rule for each property that will apply whenever a user chooses to enrich a company record. The three options are:
- When blank use Firmable. This means if there is currently no value in the field for a record, Firmable data will be populated when enriched. This is the most commonly used sync rule.
- Override from Firmable. This means regardless of whether there is or isn’t a value in the field for a record, Firmable data will override it when enriched. Note: Be wary of using this as it will override existing data you have populated in Salesforce for that field.
- Don’t sync. You can also choose not to sync the property at all.
-png.png?width=362&height=209&name=Untitled%20(4)-png.png)
Note: During mapping, ensure that the data types match between Salesforce and Firmable so that the data can be pushed to Salesforce seamlessly without throwing any errors. Firmable supports Text, Number, and Boolean field types but for optimal compatibility, map to Text type fields in Salesforce.
- Click Save changes when done.
Mapping lead fields
Note: Firmable matches people records by email address, so ensure the email field is mapped correctly at your endpoint to enable accurate record matching downstream to avoid duplicate records.
- Click on Lead field mappings and review the list of Salesforce lead fields mapped to corresponding Firmable contact fields.
- Complete the same steps as described under Mapping company (account) fields above in the previous step including mapping of properties and choosing sync rules.
- Click Save changes when done.
Mapping contact fields
Note: Firmable matches people records by email address, so ensure the email field is mapped correctly at your endpoint to enable accurate record matching downstream to avoid duplicate records.
- Click on Contact field mappings and review the list of Salesforce contact fields mapped to corresponding Firmable contact fields.
- Complete the same steps as described under Mapping company (account) fields above in the previous step including mapping of properties and choosing sync rules.
- Click Save changes when done.
Your Salesforce Integration is now set up and ready for use.
Option to create custom Firmable ID field in Salesforce
If your Salesforce instance does not have a suitable field to capture Firmable ID, You can create a field using the following instructions. The following steps are focused on creating the custom Firmable ID field for the Account object. The same steps will need to be repeated for the Lead and Contact objects also.
- Log in to Salesforce and navigate to Accounts. Click on the settings icon in the top right corner and under Customization click on Edit Account Object.
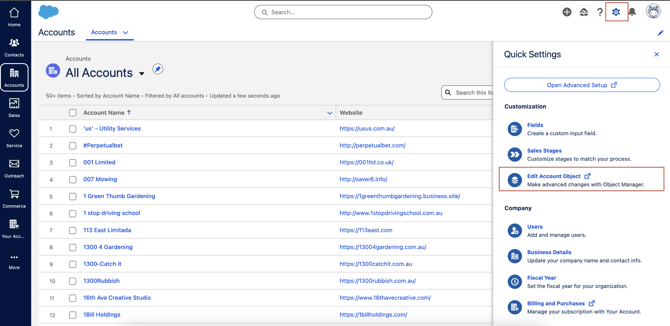
- Click on Fields & Relationships.
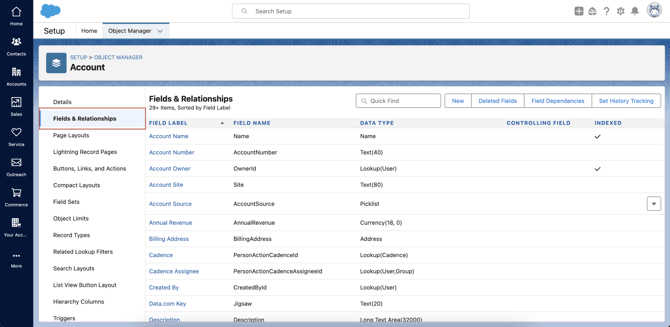
- Click New to begin creating a custom field

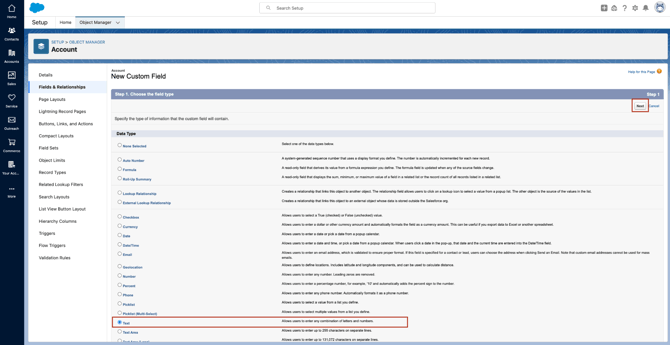
- For step one, it will prompt you to choose a field type. Select Text as the field type then click Next.
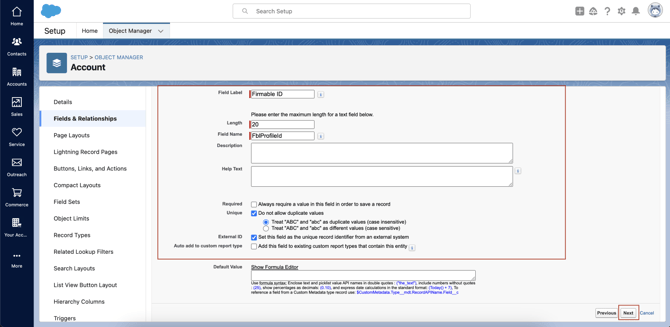
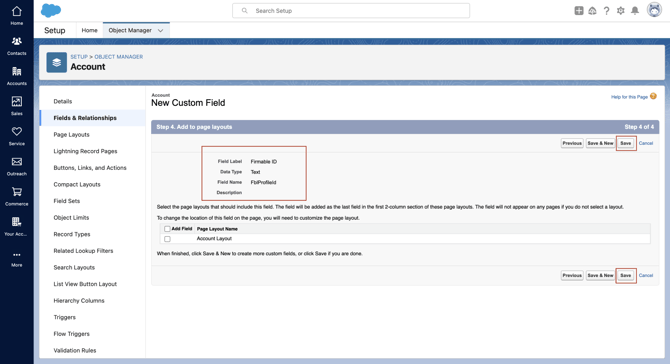
- For step two, you need to configure the field properties using the following values:
-
- Field Label: Firmable ID (recommended for easy identification)
- Length: 20 characters
- Field Name: FblProfileId
- Description: Optional only (not required for Firmable integration)
- Unique: Check this box
- External ID: Check this box (improves performance)
- Click Next
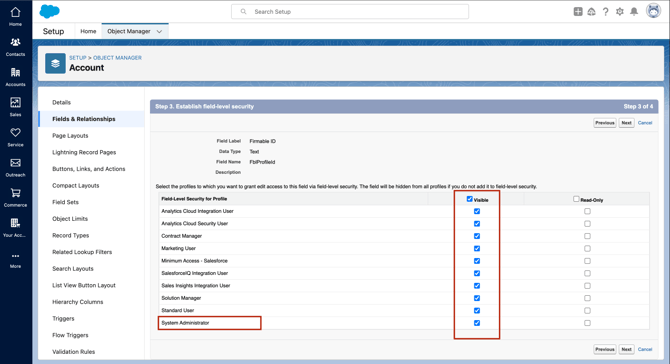
- For step three, establish the field-level security and visibility. Ensure Visible is checked for the System Administrator profile. Adjust visibility for other profiles as needed and click Next.
- For step four (final step), verify all the details, an optional step is to add the field to the Account Layout (not required), then click Save.
- You should now see the newly created Firmable ID field in the fields list.
- Repeat the above steps for both the Lead and Contact objects, from their respective pages.
Note: It's mandatory for the Firmable ID to be mapped on all three objects for a seamless integration: Lead, Contact, and Account objects.
We hope this article has helped you understand how to connect Salesforce, set up field and user mapping. If you have any other questions, don't hesitate to contact us at support@firmable.com.